
Creating a Class Field Guide for Birds
In this project we'll create a page to be included in a class field guide for birds. You'll include a bird picture you drew in Art and research you did in class to create a carefully formatted page that will be included in a class book.
Follow the Formmating Guide!!
You will create a page in MS Word that matches the formatting guide EXACTLY! Click here to open a copy of the FORMATTING GUIDE.
Start by opening up the template file. You will find it on the 3 - Third Grade folder in the Student shared folder (use your shortcut in your Favorites. Click here to open a copy of the template!
Before you start working on the file, be sure to save it using SAVE. You should name it Your Name Your Bird. Mine would be named "Mr. Biggs Robin". Save it in your Documents folder.
Insert Your Bird Picture
You can find your bird picture in the Student Shared folder. Click on the 3 - Third Grade folder in your favorites and you'll see a folder of bird pictures for each classroom.
To insert a picture, follow these steps:
- Click just below the name of your bird on the first page and make sure you see the blinking insertion point just below the text.
- Click the Insert Tab on the ribbon.
- Click Picture.
- Browse to the correct folder and find your picture.
- Double click on your bird picture.
- Now click on your picture to select it (you'll see the handles appear on the edge).
- Click the Format tab on the ribbon (it will be on the right hand side).
- Click the DOWN ARROW next to Wrap Text and choose "in Front of Text". This will allow you to easily rotate and resize your picture just like you would in PowerPoint.

Creating a Table for Your Information
To make sure your information looks nice, we are going to use a TABLE. A table is just a way to make nice rows and columns to keep things lined up nicely.
To create a table, follow these steps.
- Click on the top of the second page. Make sure you see the blinking insertion point.
- Click the Insert tab on the ribbon.
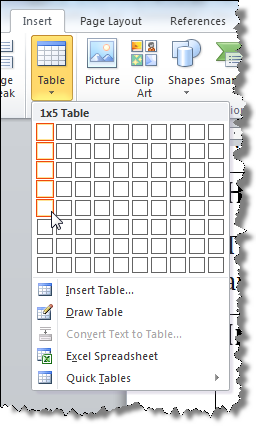
- Click on the Table button. A menu will pop up. Drag your mouse through 5 boxes on the left side just like you see in the picture below.
- Now you'll see a table (5 rows) that you can start to type information into, using the exact formats you see on the formatting guide.
- Click here to watch a little video explaining how to do this.