 Life in the Tech Lab
Add Music to Your Audacity Project
Now that we've added sound effects, the only thing left is to learn how to add some music to our project.
You will need the following music file (in MP3 format) for this project. RIGHT click on it and then select Save Target As... Save the file in your MY DOCUMENTS folder so you can find it easily.
Intro Music for Project (the file is called Seventh_Avenue_South_15)
Make sure your Audacity project called First Recording is open.
Now import the file (called Seventh_Avenue_South_15) into your Audacity Project.
To do so, select File --> Import --> Audio from the file menu, locate the file and open it.
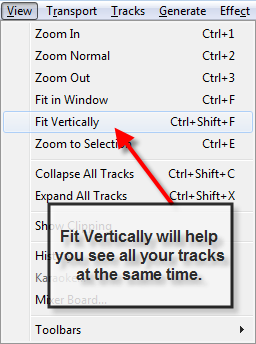
Importing the tracks makes you scroll a lot, which isn't fun. We'll use the view menu to make it easier to see everything.
When you insert the music, there is a good chance that all your tracks will no longer fit in the screen. You'll have to scroll up and down to see all the files. This adds frustration and unnecessary work to the editing process.
To overcome this, Audacity will help you fit your tracks on the screen. As long as you only have four or five tracks, this trick works well.
Select View --> Fit Vertically and all of your tracks will automatically be resized to fit in the window for you.
The first thing we'll need to do to fit the music into our project is to give some room at the beginning of the project to listen to just the music. To do that we must select everything in all of the tracks EXCEPT the music and then use the Time Shift Tool to slide them over. Move them until the speaking track starts at about 5 seconds.
NOTE: It is best to watch the video to understand how to select and move the parts.
Now we are going to use another tool in the TOOLS toolbar to edit the sound. The Envelope tool. This tool allows you to raise and lower the sound at different points of your track. This is great for music because sometimes we want it a bit louder (like at the beginning or end and then have it fade in or out to transition to voices talking.
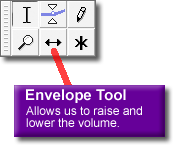
Select the Envelope tool (just click on it) and let's use it to adjust our music file.
Move the Envelope tool (the two triangles facing each other) over a point on the heavy blue line that borders the track and click. You'll see a white dot appear on top and bottom of the track. This is called a VOLUME CONTROL POINT. It looks like this:

Using the Envelope tool, click on a CONTROL POINT and drag down. The volume gets softer. Pull it back up and volume gets louder.
You can create many CONTROL POINTS and raise and lower the volume throughout the track. Click on a second spot on the heavy blue border line and lower the volume. You'll notice a diagonal line between the previous point and the one you just created and then the volume stays flat again. This allows you to ease the volume up and down to avoid extremes in the music.
Here is what it looks like with a second point created and the volume brought down a bit.
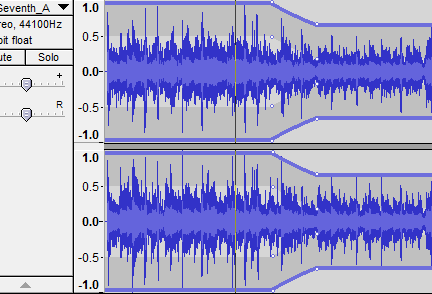
>With this we can start with louder volume, bring it down to soft undertone while we talk and then either bring it back up or just fade it out as it goes away.
Here is a picture of the project with the music starting loud, then going soft when the narrator speaks, then fading away entirely as the audience claps.
To really learn the steps in this part of the project, I highly recommend that you watch the video... probably more than once! Watch a section and then try it in Audacity. Watch another and try it. You'll learn much more that way!
One last thought. Remember, you use music to bring emotion to your story. Music puts people in a certain mood and makes them enjoy the story more. Take time to select the right music for different parts of your story. This is one area where you don't want to cut corners!