

Creating Your Rome Website with Dreamweaver 8
Follow each link below to find help to build your Rome website!
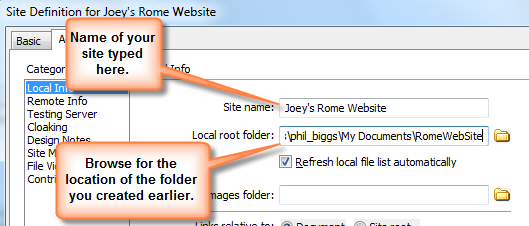
Create Your Site in Dreamweaver 8
Dreamweaver 8 not only helps you build web PAGES, it also helps you manage web SITES. A web site consists of all the files you use to create your pages: the pages themselves, graphic files, video files, etc. In order for your site to work, EVERY file used in the web site must be inside the folder you create for the site.
|
Create Your Banner Using Fireworks 8
Create a BANNER that you will use on the top of each page in your site. Use Fireworks 8 to accomplish this.
Your banner must be sized 950 pixels wide by 90 pixels high. The resolution should be set to 72.
CREATE A FOLDER IN YOUR WEBSITE FOLDER CALLED 'IMAGES.' SAVE YOUR BANNER IN THIS FOLDER.
Some past Samples
The samples below are sized smaller to fit on this page.


Create the First Web Page
Now you are ready to create your first web page. We'll create this page and use it to tweak your Cascading Style Sheet File in the next section. When you get this page working perfectly, we'll use it to create all the other pages. It is important to take your time and test this page thoroughly. Once you've created all the other pages, you'll need to visit each one to make corrections and changes, which can prove to be quite time consuming!
To start this section, first download the Sample CSS File. (SAVE THIS FILE IN YOUR ROME WEB SITE FOLDER!)
- 1. Create Page
- 2. Link to CSS
- 3. Add HTML Code
Step 1: Create Your Page in Dreamweaver
Be sure you have Dreamweaver open before starting this step. You should see your site in the FILES section on the right of the page as well.
Follow the steps below to create a blank page.
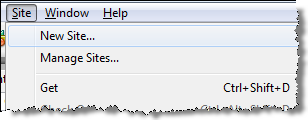
| Select File --> New... | ||
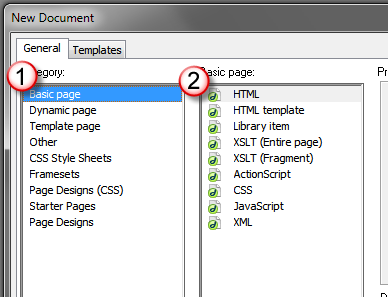
Make sure you are on the GENERAL tab, then follow these directions:
|
 |
|
| Now click Create. This creates a basic web page for us with no frills. | 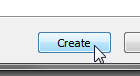 |
|
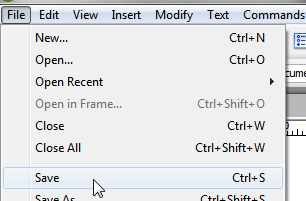
Now you need to save your file right away. Because everything is linked together in web pages, the sooner you save your file and give it a place to live, the sooner all your links start working correctly. Start by clicking Save from the File menu. |
 |
|
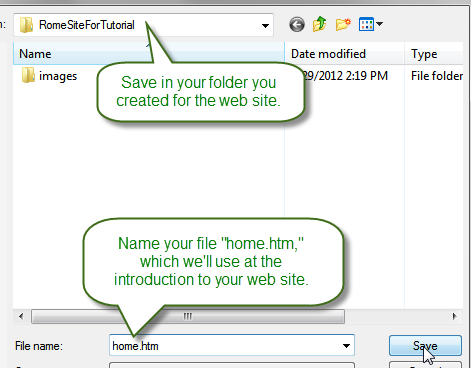
Name this file home.htm (just use lower case letters). This will become the starting page for your web site. Make sure you are saving in the folder you have created to hold all of your Rome web site assets (like pictures, videos, banners, buttons, etc.). Always remember to copy everything you'll need for a page into the Rome web site folder BEFORE you start working on the page. If you find you haven't copied it there when you go to link it, copy it to the folder FIRST and then come back and link to it, or add it to the page. |
 |
|
| The last step is to check the File Manager and make sure the home.htm page is listed. If it isn't, you may have saved it in the wrong folder. NOW is the time to check! |  |
|
Step 2: Link to the CSS File
Now that you have created a page, we need to link to the CSS file so all our styles will show up instantly.
| Find the CSS tab in the area on the right of the work area. Locate the chain link on the bottom of the CSS window and click on it. | 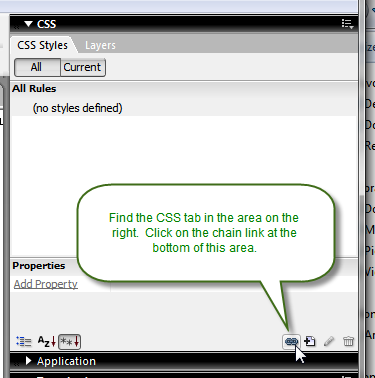 |
|
| The Attach External Style Sheet dialog box will open. Click Browse to select the CSS file you just downloaded from above and saved in your web site folder. (You DID do that, didn't you??) | 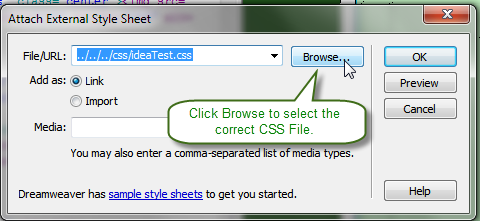 |
|
| Find the proper file in your Rome web site folder and double click on it to select it. |  |
|
| Now select the Add as: Link button. This means we are going to just link to page and keep the styles seperate from the actual web page, which is considered best practice in creating good web sites. | 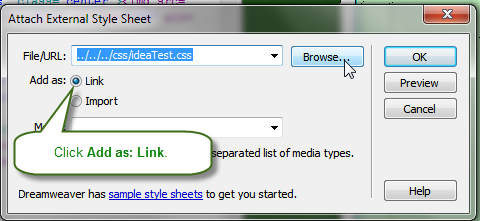 |
|
| To see if your CSS file was linked properly, look in the CSS window. You should see the name of your file there. In my example, I have expanded the sheet wo we can see the actual CSS elements I have created inside the file. | 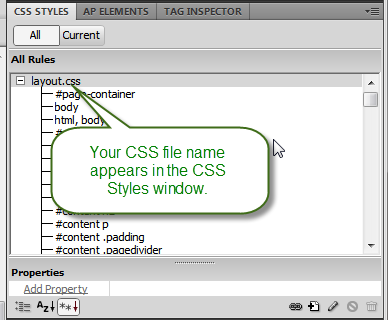 |
|
| That's it! Our first file is created and we've link our CSS file to it. Before we start actually changing CSS attributes, we first need to create the sections (the DIVs) in our home.htm web page so we can actually see the changes we are making! Click Step 3 above for those directions! | ||
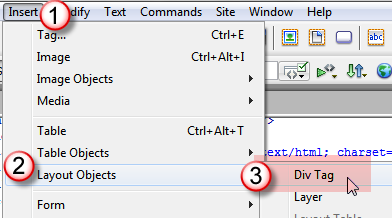
Step 3: Add the HTML Code to Create the DIVs
This is the last real technical step to creating your web site. Remember, the CSS file, Rome.css, defines the way we want the sections of the page to look. It's purpose is to keep style changes in a seperate place. If we never use those styles in the web page itself, however, we'll never see them! So, our first task in our home.htm page is to set up the sections, called DIVs in HTML, that build the structure for our page. When you open the style sheet and look at it, any line that starts with a '#' sign signifies the beginning of a definition of a DIV.
Let's get started adding the DIVs to our home.htm web page.
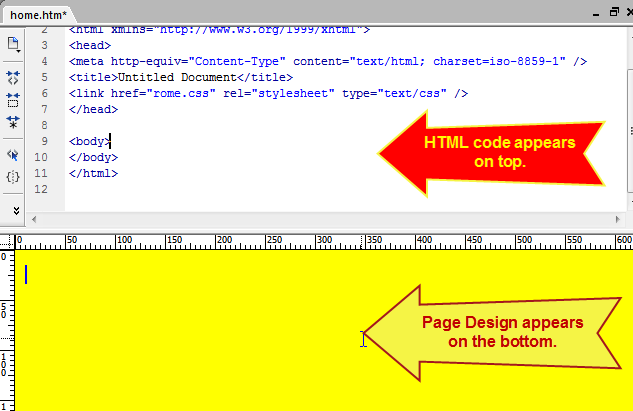
| Click Split so you can see the HMTL code and the page design at the same time. |
|
|
Now we are ready to add the first DIV (section).
|
 |
|
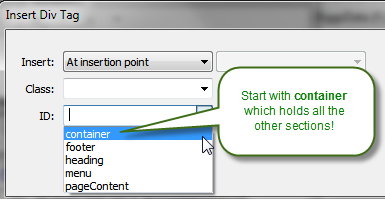
The first DIV we want to create is the 'container' DIV. If you remember, this holds all the other DIVs together and allows us to add some cool effects like a drop shadow to our page to make it look like it is floating on top of the background. Find the ID section of the dialog box that opened and click on the box to the right. You should see all the DIVs that are defined in the Rome.css style sheet. Click on container to select it, then click OK to insert it in the page. |
 |
|
| The DIV looks like this on the page. Not very impressive, is it? Dreamweaver isn't able to display a lot of the styles without previewing them in a web browser, so don't worry about looks just yet! |  |
|
| IMMEDIATELY after inserting the container DIV, before you click anywhere, go back and repeat Step 2 to insert the next DIV, 'heading.' | 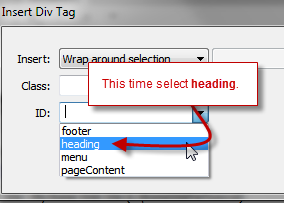 |
|
| Now find the line in the code section of your page that looks the one on the right and click at the end of it, and then press return to insert a blank line. | 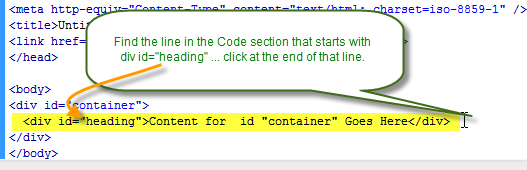 |
|
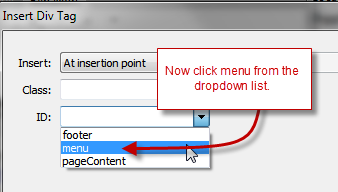
Repeat Step 2, this time inserting the 'menu' DIV. You'll notice that each time we insert a DIV, it disappears from the choices in the drop down menu. This is because we can only use a DIV ONCE on a page! |
||
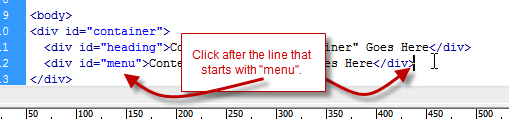
| Next find the menu DIV line, click at the end and press return to insert a blank line, then insert the 'pageContent' DIV. |
|
|
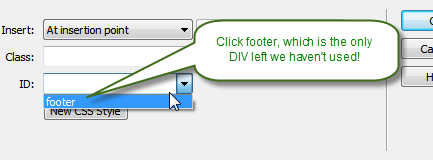
Repeat the steps to add a DIV, but this time add the 'footer' DIV. If you have successfully added ALL the DIVs previously, this will be the only DIV remaining.
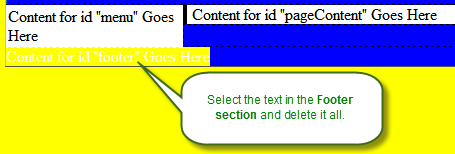
We don't want to show anything in the 'footer' DIV. It is there merely to help us close up the page. So, select all the text in this DIV and delete as shown on the right. |
|
|
Edit Your CSS File
Learning to use Cascading Style Sheets can often take quite some time. To help you use this very powerful technique in your site, I've created a CSS file that you can download and use for your own site. Use this section of the tutorial to understand how you can use the contents of the file to change the look of your own site pretty drastically!
- 1. Basic Layout
- 2. body
- 3. #container
- 4. #heading
- 5. #menu
- 6. #pageContent
Understanding the Basic Layout
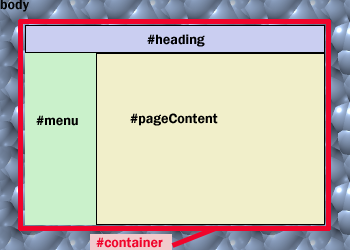
The CSS file creates 4 new sections. If you look at the illustration on the right, you can see each one illustrated. #container is what we call a "wrapper." It contains the three main sections of our site in one box and holds things together. We define the background color of this container to be the same as the menu background color, which allows the page to look like it has a continuous menu, even though that is technically very difficult. The #body is the page background itself. In the sample web site I used an image that is repeated over and over. You can do a web search using the terms 'web page texture' and find LOTS of these files ready made for you to use. As you make changes to your CSS file, keep in mind where each section lives and what might happen to it as you make your changes! Right Click and Save Target as...to download the CSS File to your web site folder. |
 |
The 'body' Section
The body section defines the elements of the entire page. Generally you shouldn't define too many things here. We just set the color of the page and then link to a file that will be repeated over and over on the page to create a textured background.

You should download a background texture for your webpage (save it in your 'Images' folder) and then link to that image for your background-image. Want to see the fast way to accomplish this? Click here!
You can make your page much more appealing by using backgrounds. For a more detailed explanation of the background property, click here!
The '#container' Section
This section is called a "div," which you could think of as a box on your web page. The function of the 'container' div is to hold all the other sections together in one piece. This allows you to create cool effects, like add a shadow effect to make your page stand off the page, position things correctly on your web page without a lot of work and also to color the background of 'container' to match the background color of the menu. This makes your page flow better from top to bottom without ugly blocks of strange colors.
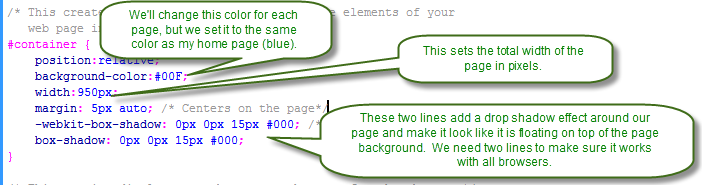
The 'box-shadow' property makes your page look GREAT, but it can only be used with the newest web browsers. Internet Explorer doesn't display it, so if you want to see it on a school computer, you'll need to use either Firefox or Google Chrome.
You can learn about all the 'box-shadow' details by clicking here.
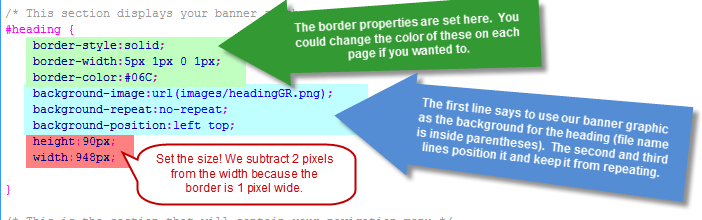
The '#heading' Section
#heading is also a 'div,' but it is placed INSIDE the '#container' div, which as we said before, holds all the parts of the page together for us. The basic heading breaks down like this:
- Lines 1-3 set up the border.
- Lines 4-6 identify and position the banner graphic you created earlier.
- Lines 7-8 set the size of the header to match your banner graphic.
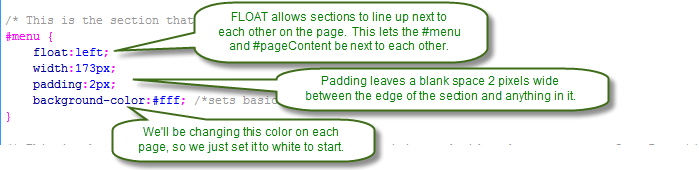
The '#menu' Section
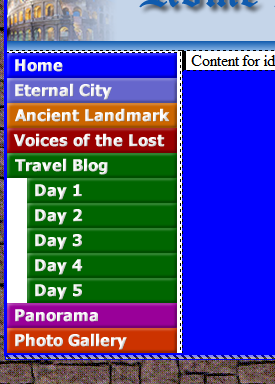
The menu section sits under the heading on the left hand side of the page. It "floats" on the page, which means it allows other divs to live to its right side. The menu section is our navigational section and will contain the links to all the other pages, which we will create graphics that will serve as buttons for each link.
An important part of website design is to think about leaving clues that help people uniderstand where they are at any given time in your page. One easy way to do that is through the use of color. If you look closely at the Sample Site, you can see that I've matched the color of the menu background, the title of each page and the color of the text with the color of the button so no matter where you are on the page, you can remember what section you are reading.
Always keep your audience in mind and make it as easy as possible for them to use your web site!
There isn't much to do in the #menu section, but remember that you'll be changing the background color on each page by overriding this style sheet with what we call an "internal style sheet" defined in the <head> section of your page.
The '#pageContent' Section
This is the section that will hold all of your writing, video, panoramas, and pictures. It is the true heart of each page. We want to format this section to be as easy to read as possible. We'll set the background color to be white, or at the least a real light color. If you DO use color, watch that it matches with the other colors on your page!
Read the explanation for each part of this section below.
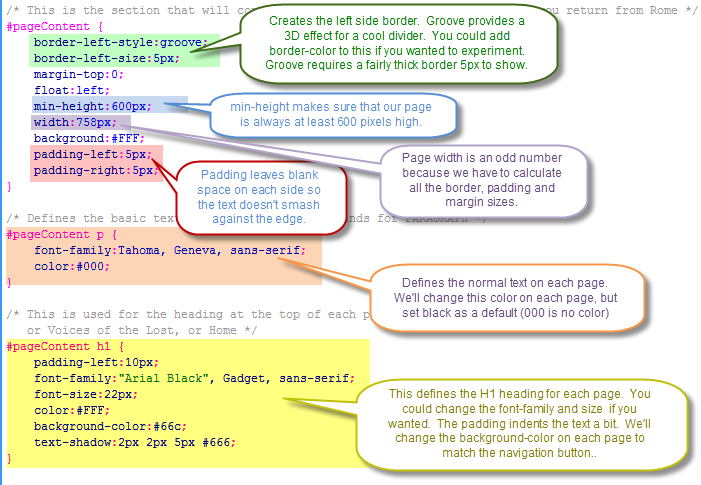
You'll notice that we can redefine the p (paragraph) and h1 (Heading 1) formats only for text in the 'pageContent' div by using #pageContent before each. We could use H1 in other parts of our page (like in the menu section) and it wouldn't affect that text at all. Cascading Style Sheets allow us to be very precise!
Create Your Buttons in Fireworks (OPT)
- 1. Create the Buttons
- 2. Place the buttons
- 3. Link the Buttons
1. Create Your Menu Buttons
Use Fireworks to create buttons for your page. If you are using the dimensions in the Rome.css file without any size changes, they should always be 170 pixels wide. Height is up to you, but don't get too carried away. In the sample site, the buttons are 25 pixels high. Keep in mind that you want all the pages to fit easily in one screen so people don't have to scroll to find a way to navigate to the different pages.
| I created the effect of the Day 1 button being indented by making it 170 pixels wide, the same as the other buttons, but I left a 20 pixel transparent spot at the beginning, so it looks as though I've indented it. It makes it easy to fit on the page and doesn't take a lot of tricky positioning. |
| Button Width: | 170 |
| Button Height: | between 25 and 50 as a general rule |
We are using color as a navigational aid for your site, so each button should be a different color that will match the page it goes with. If you are going to match the color of the font on each page like you saw in the sample site, you'll need to make sure your colors are all on the darker side. Pastels won't work well!
2. Place the Buttons on the Web Page
Now it is time to place the buttons on the page. To do this, you simply insert the graphics for each button in your page. It is easiest to place them all in order, but if you forget one or put one in the wrong spot it is easy to fix it!
| First select all the text in the menu DIV and delete it. | 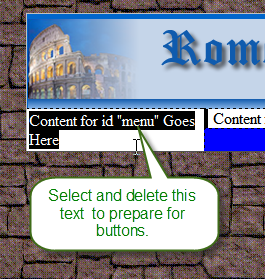 |
|
Now:
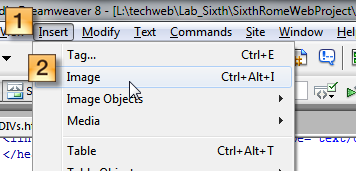
Then open the image that you want to use for the first button. In my case that is the home.png file I created earlier in Fireworks. |
 |
|
| This opens up a dialog box where we create the ALT tag. This helps those who have various handicaps use our web page effectively. Type in Home Page since this is what this graphic refers to. | 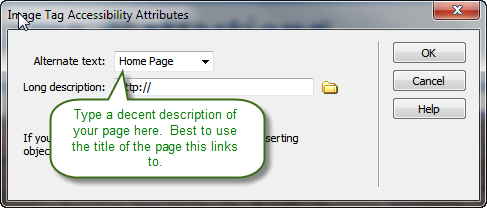 |
|
The ALT tag option is used to help those with handicaps such as blindness use our page. Since they can’t read what is shown, they have page readers that can read the page for them. That doesn’t work when we put images on the page, so each picture can have alternative text (hence the ALT tag) that describes what the picture is or does. Programmers have a variety of tricks to use the ALT tag to make web pages better for ALL of us! |
||
| To prepare for the next button, click the mouse immediately after the button. Don't press Enter (Return on Mac). Just make sure the insertion point is blinking right after the graphic. | 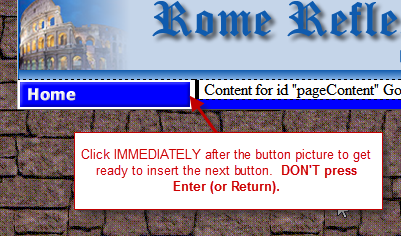 |
|
Now repeat steps 2 and 3 above to place all the buttons. If you've completed this step correctly, all the buttons should be in the menu DIV, with no spaces or blank spots between them. The example to the right is from the Sample Web Site. |
 |
|
3. Link the Buttons to the Correct Pages
The next, and arguably most important, step is to link the buttons to the proper pages! Since you haven't actually created all the pages yet, we'll have to type in the names for each future page. If you aren't sure of the names, you can find the list by clicking here. Look under the Site Contents tab.
| Click on the button you want to link to a web page. In the example on the right, we've selected Home. | 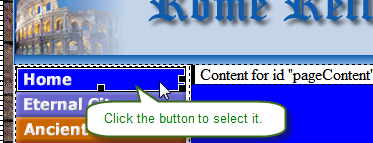 |
|
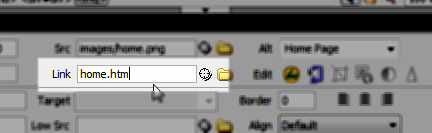
Locate the Link area in the properties panel and type in the name of the web page you want to link to. Since this is the Home button, I typed in home.htm. Be sure to use the names provided in the project overview. |
 |
|
Repeat the above steps for each of the buttons in your menu. Take time to check each button twice to make sure you've linked it. Once you've begun the process of creating all your pages, you'll need to fix any mistakes on every page, not just this one! An ounce of prevention is worth a pound of cure! |
||
Add the Internal CSS Code
In the last step we are going to build INTERNAL CSS STYLES that will override those that are defined in the Rome.css style sheet. This allows us to change the color for each page by redefining the color of the menu DIV background, the color of the heading and the text in the pageContent DIV.
Web pages always use the style definition closest to the content of the page. So styles defined in the tag of the page, called IN-LINE styles are always used first. Styles defined in the HEAD of the document, called INTERNAL STYLES are used next. Lastly, styles defined in an external document, such as Rome.css, are used last. Most of the time the only styles we use are in the external document, but it is always good to have ways to easily customize a page.
| First, make sure you are in "Split Mode", with the code and the page design showing. | 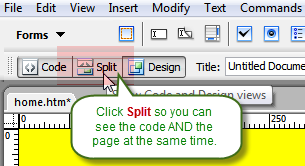 |
|
Now copy the code below:<style type="text/css"> |
||
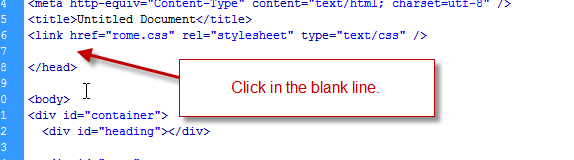
Back in the CODE section of your web page, locate the end of the HEAD section of your page with this tag: </head> Click at the beginning of this line and press enter to create a blank line just about the </head> tag.
|
||
Now click in the blank line you just opened up.
|
||
| Now paste in the code you copied in Step 2. It should look something like the illustration on the right (the colors might not match). | 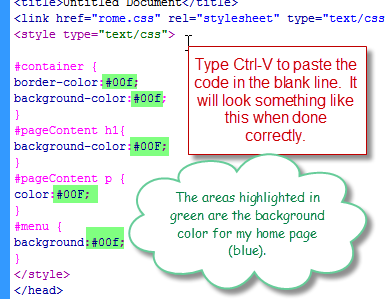 |
|
You can see the green highlighted areas in the illustration above. These define the colors for the background of the container DIV, pageContent DIV, and menu DIV. They also define the color for the heading and the text in the pageContent DIV (#pageContent h1 (which is Heading 1) and #pageContent p (the regular text). This matches up all the colors on the page to match the button. Why do I see numbers instead of names of colors?
|
||
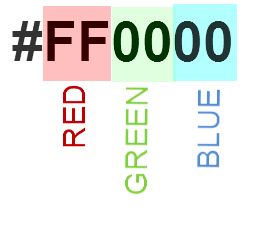
There are millions of color combinations so it would be impossible to give them all names! Computers combine the colors Red, Green and Blue (RGB) to make all these colors. Web pages use hexadecimal numbers to represent colors. These are generally SIX digit numbers, such as #FF0000. Numbers are in base sixteen and range from 0 - FF, with zero being none of that color and FF being full color. In the example on the right, we only have red (green and blue are both set at 0) so this is a solid red color. If I had #0000FF, this would be solid blue. The best way to find colors is to use a web based color picker. This is my favorite: |
 |
|

Create All Your Pages
At this point you are ready to create your pages. The easiest way is to open the home.htm page and simply select File --> Save As... and rename the page for each of the pages you need in the list your find in the project overview.
When you have completed each page, you will need to go into the code section and match the Internal CSS Style colors to the button color for that page.Create Your QTVR Panorama
Here is an example of a QTVR Panorama that I created from photos taken at the Maui Banyan in Hawaii.
Click in the picture and drag your mouse left and right to circle around. Hold down the Shift key while dragging to zoom in and the Ctrl (Control) key to zoom out.
Are you ready to create a QTVR Panorama? Click here for full instructions!
Create Your Photo Gallery
We are going to use "JQuery", a library of programs that allows you to quickly create awesome effects on your web pages with very little work. We will use a "JQuery Plugin" called 'FancyBox' that allows us to pop open windows and scroll through all the pictures with ease! It will take some work, but in the end it will be well worth the trouble because your page will look modern and fresh! Follow the numbered tabs below to put together your Photo Album.
FIRST, take a look at the sample web site to see what this should look like. Click on a picture, and you'll see that you can use the next and previous arrows to view the entire collection of photos on the page. Click the X in the upper right corner to go back to the Photo page.
- 1. Copy Files
- 2. Insert Code
- 3. Create a Table
- 4. Link to LG Picture
- 5. Add Fancybox Code
1. Copy Files from "Student" on the server
First you need to copy the JQuery and Fancybox files to your web site.
Open to the following location on the server.
Computer --> Student --> Biggs --> 6 - Sixth Grade --> For Rome Photo Gallery
You will see two folders. 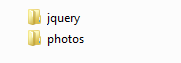
Copy these to the folder you are using to create your web site.
2. Insert Correct Code in Your Page
Open your Photo Album page. You will need to copy the code you see below into the HEAD section of your page. I would suggest you place it just before the </head> tag to make sure you don't break any other code you have previously entered. This gets the JavaScript and CSS files you need to make the pictures pop open on the page.
<!-- Fancybox elements for the Photo Gallery Page -->
<!-- Add jQuery library -->
<script type="text/javascript" src="jquery/jquery-1.7.2.min.js"></script>
<!-- Add fancyBox -->
<link rel="stylesheet" href="jquery/jquery.fancybox.css" type="text/css" media="screen" />
<script type="text/javascript" src="jquery/jquery.fancybox.js"></script>
<!-- Fancybox Javascript -->
<script type="text/javascript">
$(document).ready(function() {
$(".fancybox").fancybox();
});
</script>
3. Create a Table to Hold Your Pictures
Now we need a place to arrange small "thumbnails" of your pictures. In web design, the best tool for this is a table. Follow the steps below to create a table for your picture thumbnails.
Select Insert --> Table from the menu bar.
Change the Rows and Columns number to match the number of pictures you will include. I would suggest you change each to 4 which will allow you to include 16 pictures on your web site.
You will see something similar to this when your table is inserted:
2. Place and Add Code for Pictures
Now comes the part that requires the most detail and attention! You saw that I provided a folder of photos. You can use these to practice for your pictures you'll bring back with you. Let's get started!
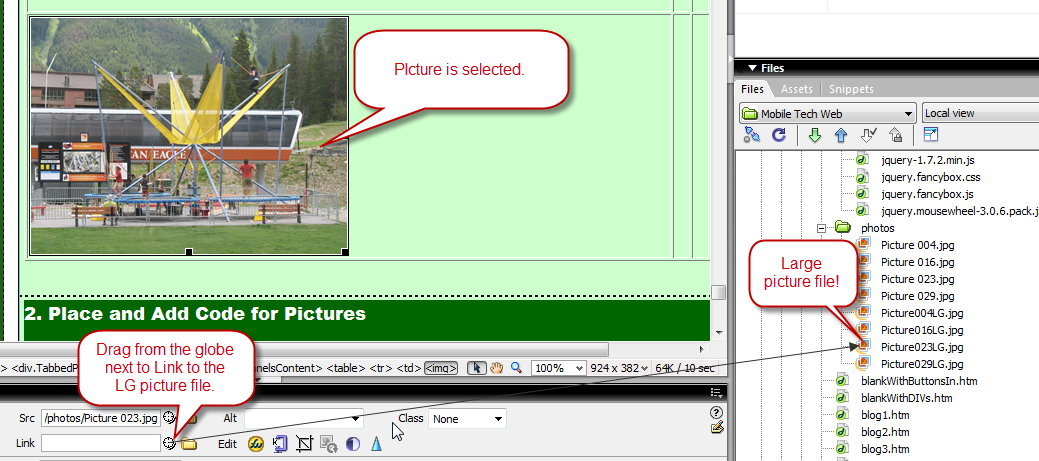
First, you'll notice that there are two of each picture in the folder. One has the letters LG at the end, the other doesn't. I've used Fireworks to make the ones without the LG at the end into smaller "thumbnails" that we can place on the page so people can easily go back and look at pictures of their choice. As you have probably guessed, the LG stands for large. We'll link to the large image, but instead of going to another page like most links, we'll add some code that uses Fancybox to open the picture into a cool image gallery on top of your web page. You see it quite often in web pages now, and this is the way.
Begin by placing the thumbnail pictures (the ones without the LG) on your page. Put one picture in each cell of the table. When it asks for the ALT text, you can just type in Colorado. Remember, this is how blind people can read your page, so you'll want to use it later.
Now link each picture to the corresponding picture that has the LG in it. The picture below demonstrates how.
5. Add Code to the Link
The last step is to add some code to each of the picture links. This is probably the hardest part to understand at first, so read closely and follow along even closer!
| First, click on a picture to select it, then look in the code section and you will see the code that links that picture also highlighted. (You must have Split selected). |
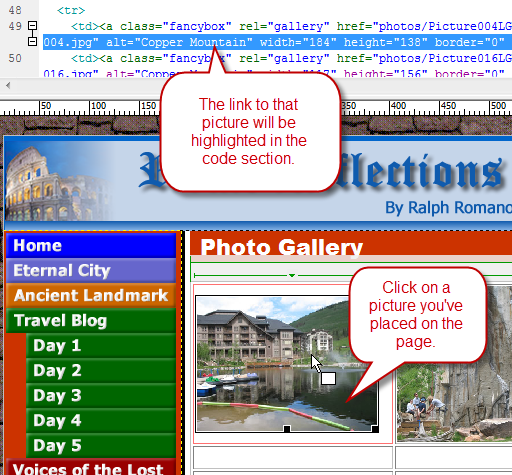 |
Now, copy the code to the right and paste it in to the <a> (link) tag as shown below. The only thing you will need to change in this code is what is inside the quotation marks after title. This is the caption that appears with your picture.
|
class="fancybox" rel="gallery" title="Copper Mountain Resort" |
 |
|
Repeat this for each picture you will include in your photo gallery. When you preview in the browser, it should open up just the sample. Once we start actually using your pictures from Rome, I will show you a faster way to add the pictures. |
|
Embed Video into Your Web Pages
Embedding your video directly into a web page looks much better than just linking to the video and forcing it to open in Windows Media Player. Use the directions and HTML code below to embed your videos.
To easily embed your video, you'll need to copy the code below that matches the video you are embedding and paste it into the HTML code of your page at the spot you want the video to appear.
![]() Click here to watch a video of this step.
Click here to watch a video of this step.
Embedding Windows Media (WMV) Files
If you saved your video properly as a WMV (Window Media Video) file, this code will work to show your Voices of the Lost video.
<OBJECT id='mediaPlayer' width="320" height="240"
classid='CLSID:22d6f312-b0f6-11d0-94ab-0080c74c7e95'
codebase='http://activex.microsoft.com/activex/controls/ mplayer/en/nsmp2inf.cab#Version=5,1,52,701'
standby='Loading Microsoft Windows Media Player components...' type='application/x-oleobject'>
<param name='fileName' value="YOUR VIDEO FILE HERE">
<param name='animationatStart' value='1'>
<param name='transparentatStart' value='1'>
<param name='autoStart' value='1'>
<param name='ShowControls' value='0'>
<param name='ShowDisplay' value='0'>
<param name='ShowStatusBar' value='0'>
<param name='loop' value='0'>
<EMBED type='application/x-mplayer2'
pluginspage='http://microsoft.com/windows/mediaplayer/ en/download/'
id='mediaPlayer' name='mediaPlayer' displaysize='4' autosize='0'
bgcolor='darkblue' showcontrols='0' showtracker='1'
showdisplay='0' showstatusbar='0' videoborder3d='0' width="320" height="240"
src="YOUR VIDEO FILE HERE" autostart='1' designtimesp='5311' loop='0'>
</EMBED>
</OBJECT>
Embedding Quicktime Media (.mov) Files
Use this code for each of the QTVR panorama videos you want to embed in a page!
<OBJECT classid='clsid:02BF25D5-8C17-4B23-BC80-D3488ABDDC6B' width="320" height="240" codebase='http://www.apple.com/qtactivex/qtplugin.cab'>
<param name='src' value="YOUR VIDEO FILE HERE">
<param name='autoplay' value="true">
<param name='controller' value="false">
<param name='loop' value="false">
<EMBED src="YOUR VIDEO FILE HERE" width="320" height="240" autoplay="true"
controller="false" loop="false" bgcolor="#000000" pluginspage='http://www.apple.com/quicktime/download/'>
</EMBED>
</OBJECT>